Create Divi CTA Sections Expanding On Scroll Using The Intersection Observer API
In this tutorial we’ll learn how to create Divi CTA sections expanding on scroll using the Intersection Observer API.
A similar CTA section expanding on scroll is being used on ElegantThemes.com at the bottom of every page.
I’ve implemented the same CTA section a while ago for Divi too, you can check out the tutorial and download that section layout here.
But the implementation in this tutorial is different. This time we are not going to use jQuery (or any other third party JS solution).
We’ll use the Intersection Observer API with vanilla JS and some CSS.
Contents
How It Works
We need our CTA section to scroll into view and expand (scale up) when it reaches a certain point on the viewport.
Then it needs to shrink back to it’s normal size after passing the second trigger point.
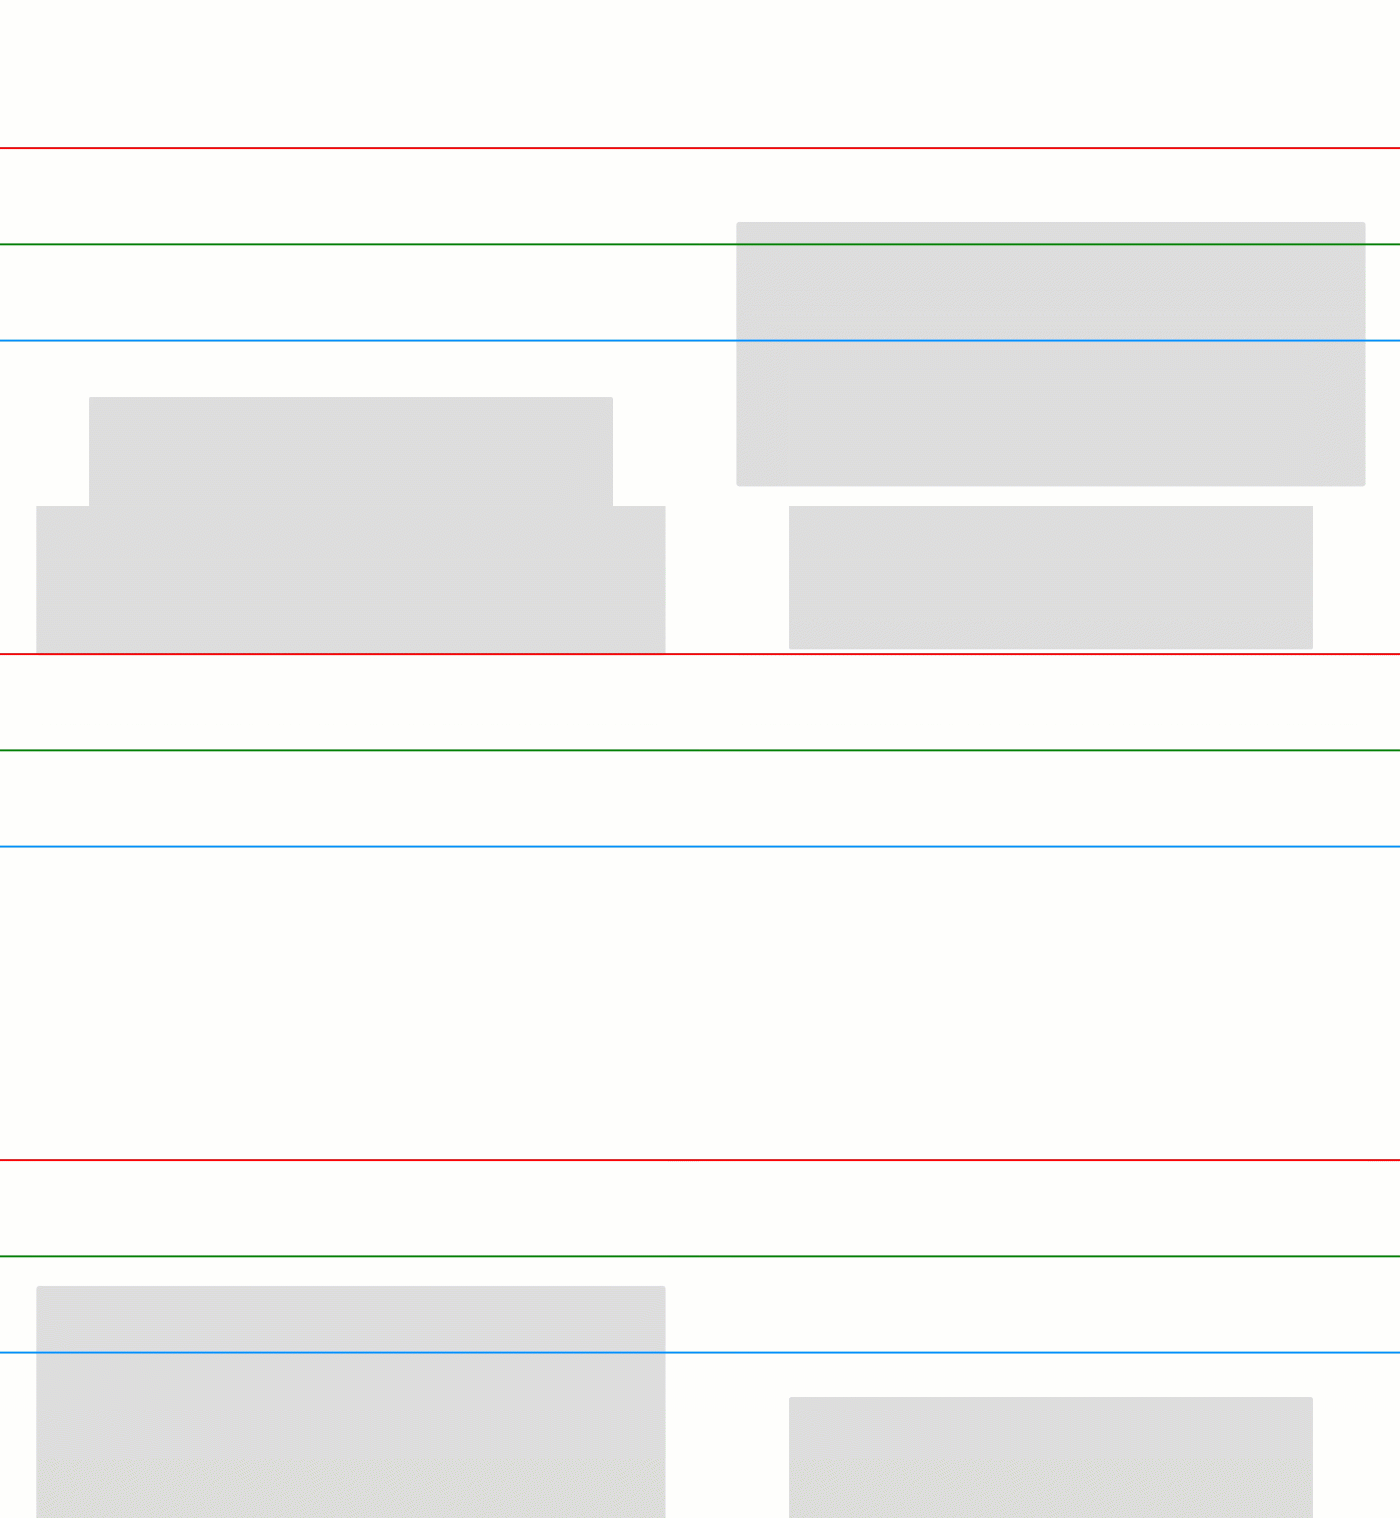
The animated graphics below represents our viewport. And the box moving up and down is the CTA section expanding on scroll.
As you can see, we have two trigger points on the viewport. The red line is the top trigger and the blue line is the bottom trigger.
These triggers are the points on the viewport where the CTA section expanding effect is activated or deactivated depending on scroll direction.
If the page is being scrolled down the CTA section expands when it reaches the bottom trigger (the blue line) with it’s top edge.
And it remains expanded until it’s bottom edge passes the top trigger (the red line). Here it shrinks back to it’s original size.
Whereas, when scrolling the page up the CTA section expands when it reaches the top trigger (the red line) with it’s bottom edge.
And it remains expanded until it’s top edge passes the bottom trigger (the blue line) where it shrinks back to it’s original size.
CTA Structure
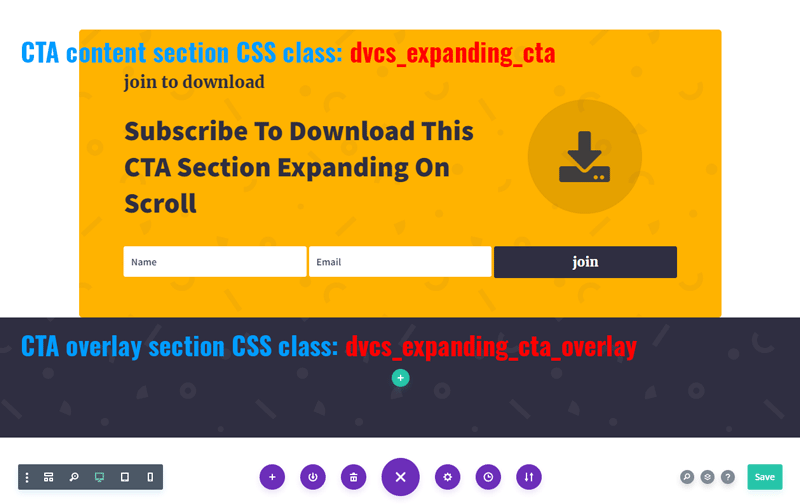
Our Call To Action layout consists of two sections. One section is the CTA content section, and the other is the CTA background overlay section.
The CTA content section contains all the content (text, images, button, etc.).
We need to add a CSS class to this section. Let’s add the dvcs_expanding_cta class in Section Settings -> Advanced -> CSS ID & Classes -> CSS Class.
The CTA background overlay section doesn’t have any content. It’s an empty section which will cover the entire viewport behind the expanded CTA section.
We need to assign a CSS class to it as well. This CSS class should be created using the CSS class we’ve assigned to the CTA content section above (dvcs_expanding_cta) plus the _overlay part.
So, our CTA background overlay section CSS class should be dvcs_expanding_cta_overlay.
We will use both these CSS classes in our CSS and JS code.
The root and target elements
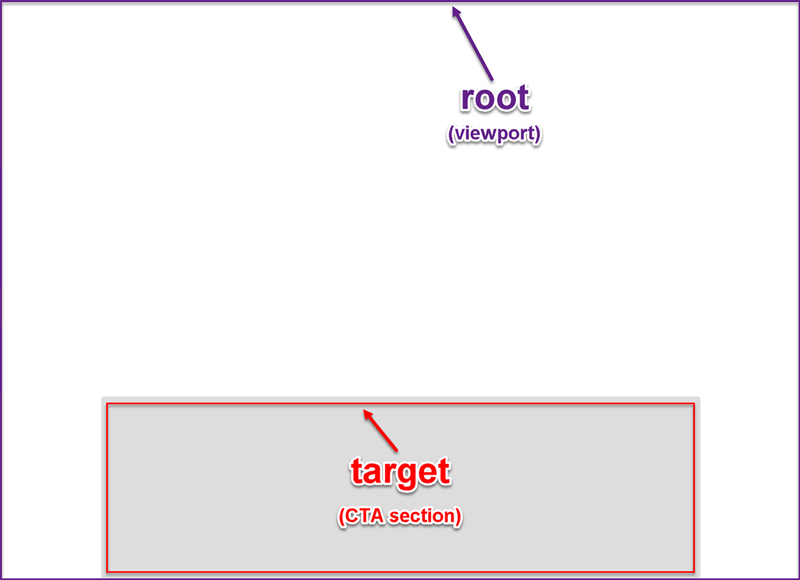
The Intersection Observer helps detect the intersection of a target element with the root.
The root must be the target element’s ancestor element, or the top-level document’s viewport (default value).
In our case the target element is the CTA content section (the one with the dvcs_expanding_cta CSS class).
And root is the top-level document’s viewport (the default value).
Options
The Intersection Observer instance accepts two arguments: a callback function, and the options object.
Our callback function (toggleEffect()) provides the logic for activating/deactivating the effect.
And the options allow us to set three values: the root, rootMargin and the threshold values.
We won’t set the root value, so, the default value will be applied.
The threshold property can have a value from 0 to 1. This value indicates the part of the target element being visible within the root.
We will use the default value for the threshold property too which is 0(zero).
So, now if we scroll the page our CTA expanding effect will get triggered as soon as it enters the root area(viewport) either from top or bottom.
But we want some part of our CTA section to be visible before the effect gets triggered.
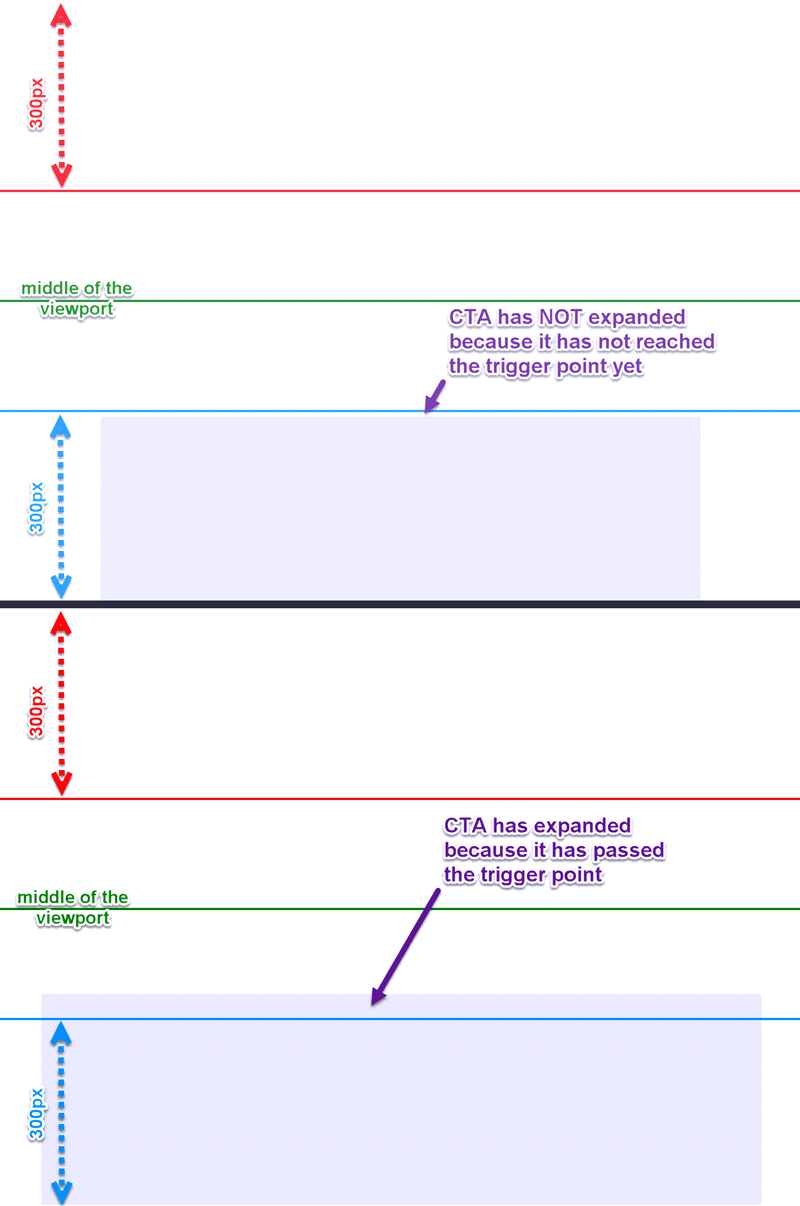
We can do that using the rootMargin property. It has a default value of “0px 0px 0px 0px” with each value representing the offsets (margin) for each side of the root (viewport) in the “top right bottom left” order.
If we use positive values for the rootMargin then the effect will get triggered before the CTA section enters the viewport.
And if we use negative values the effect will get triggered after the target element has entered the viewport for the specified amount of units (px or %).
So, since we want the visitors to see our CTA section at least partially before it gets expanded we need to use negative values for top and bottom values.
For example, if we set the rootMargin property to “-300px 0px -300px 0px“ our effect will trigger after the CTA section enters the viewport for 300px either from top or bottom of the viewport.
Implementation: JS
We implement all of the above in the dvcs_expanding_CTA() function provided below. Every part of the code has comments providing explanation about what each part of the function does.
/**
 * CTA SECTIONS EXPANDING ON SCROLL
 * @author		Ivan Chiurcci
 * @site  		https://divicio.us
 */
document.addEventListener('DOMContentLoaded', function(){

    /**
     * Observe the CTA section.
     *
     * Detects when CTA section passes the trigger points
     * and activates/deactivates the expanding effect accordingly.
     *
     * @param	{string}	ctaSelector		Selector of the CTA section.
     *                                      Must be a CSS class, for example: '.dvcs_expanding_cta'
     *
     */
    function dvcs_expanding_CTA( ctaSelector = '.dvcs_expanding_cta' ){

        // select the body element
        let body = document.getElementsByTagName('body')[0];

        // Select the CTA sections and the background overlay
        let ctaSections = document.querySelectorAll(ctaSelector),
            ctaSectionOverlay = document.querySelector(`${ctaSelector}_overlay`);

        // calculate trigger points
        let middle = Math.round(window.top.innerHeight/2),
            rootMargin = `-${middle - 50}px 0px -${middle - 50}px 0px`;

        // set the observer options
        let options = {
            rootMargin: rootMargin,
            threshold: 0
        }

        /**
         * Activate/Deactivate the CTA section expanding effect.
         *
         * Activates the effect if the target element(CTA) is intersecting the root(viewport).
         * Otherwise deactivates the effect.
         *
         * @param	{array}	entries		The Intersection Observer entries.
         */
        const toggleEffect = (entries) => {
            if(entries[0].intersectionRatio > 0){
                /* ACTIVATE */
                // add CSS class to the <body> element
                body.classList.add("dvcs_expanded_cta");
                // add CSS class to the CTA content section
                entries[0].target.classList.add("dvcs_expanded_cta");
                // add CSS class to the CTA overlay section
                ctaSectionOverlay.classList.add("dvcs_expanded_cta_overlay");
            } else {
                /* DEACTIVATE */
                // remove CSS class from the <body> element
                body.classList.remove("dvcs_expanded_cta");
                // remove CSS class from the CTA content section
                entries[0].target.classList.remove("dvcs_expanded_cta");
                // remove CSS class from the CTA overlay section
                ctaSectionOverlay.classList.remove("dvcs_expanded_cta_overlay");
            }
        }

        // create observer
        let observer = new IntersectionObserver( toggleEffect, options );

        // observe CTA secions
        ctaSections.forEach(ctaSection => {
            if(ctaSection){
                observer.observe(ctaSection);
            }
        });
    }

    // enable the effect for CTA section(s)
    dvcs_expanding_CTA('.dvcs_expanding_cta');
    dvcs_expanding_CTA('.dvcs_expanding_cta_2');
    dvcs_expanding_CTA('.dvcs_expanding_cta_3');

    // refresh the effect on resize
    window.addEventListener('resize', function(){
        dvcs_expanding_CTA('.dvcs_expanding_cta');
        dvcs_expanding_CTA('.dvcs_expanding_cta_2');
        dvcs_expanding_CTA('.dvcs_expanding_cta_3');
    })
});
As you can see, our callback function (toggleEffect()) activates and deactivates the expanding effect simply by toggling CSS classes on the body element as well as the CTA content and background overlay sections.
It adds/removes the dvcs_expanded_cta class to/from the body element. We’ll use this class to manipulate other elements on the page.
And toggles CSS classes on the CTA section(s) to activate/deactivate the expanding effect for the correct CTA section (in case you have more than one expanding CTA sections on the page).
Implementation: CSS
Now let’s apply the CSS to do the followings:
- Hide the horizontal scrollbar showing up when the CTA section is expanded.
- Set the CTA content and background overlay sections’ z-index values so that the overlay section stays behind the content section.
- Make the background overlay section cover the entire viewport.
- Set the rules for the expanded CTA section.
/**
 * CTA SECTIONS EXPANDING ON SCROLL
 * @author		Ivan Chiurcci
 * @site  		https://divicio.us
 */
/* hide horizontal scroll bar */
.entry-content {
    overflow-x: hidden;
}

/* CTA */
.dvcs_expanding_cta,
.dvcs_expanding_cta_2,
.dvcs_expanding_cta_3 {
    z-index: 9;
}

/* CTA background overlay */
body:not(.et-fb) .dvcs_expanding_cta_overlay,
body:not(.et-fb) .dvcs_expanding_cta_2_overlay,
body:not(.et-fb) .dvcs_expanding_cta_3_overlay {
    opacity: 0;
    visibility: hidden;
    pointer-events: none;
    position: fixed;
    top: 0;
    bottom: 0;
    left: 0;
    right: 0;
    z-index: 8;
}

/* CTA and it's background overlay */
.dvcs_expanding_cta,
.dvcs_expanding_cta_overlay,
.dvcs_expanding_cta_2,
.dvcs_expanding_cta_2_overlay,
.dvcs_expanding_cta_3,
.dvcs_expanding_cta_3_overlay {
    -webkit-transition: all 500ms ease-in-out;
    -o-transition: all 500ms ease-in-out;
    transition: all 500ms ease-in-out;
}

/* expanded CTA */
.dvcs_expanded_cta .dvcs_expanded_cta {
    -webkit-transform: scale(1.2);
    -ms-transform: scale(1.2);
    transform: scale(1.2);
    z-index: 10000;
}

/* expanded CTA background overlay */
body.dvcs_expanded_cta .dvcs_expanded_cta_overlay {
    opacity: 1;
    visibility: visible;
    pointer-events: initial;
    z-index: 9999;
}

/* align the Opt-In module fields horizontally on larger screens */
@media all and (min-width: 768px){
    .dvcs_expanding_cta_3 .et_pb_newsletter .et_pb_newsletter_fields > * {
        -ms-flex-preferred-size: 100%;
        flex-basis: 33%;
    }
}
Hide Other Page Elements When CTA Section Expands
Toggling the dvcs_expanded_cta CSS class on the body element allows us to do different stuff with any element on the page using that CSS class.
So, let’s add some more functionality to our CTA section.
For example, we can hide the Divi theme default header, dot navigation and the back-to-top button when the CTA expands. Just a few CSS rules will do that:
/* Show/Hide elements on the page */
/* Hide default header when CTA is expanded */
.dvcs_expanded_cta #main-header {
    -webkit-transform: translateY(-100%);
    -ms-transform: translateY(-100%);
    transform: translateY(-100%);
}

/* Hide Dot Navigation and Back To Top button when CTA is expanded */
.dvcs_expanded_cta ul.et_pb_side_nav.et-visible,
.dvcs_expanded_cta .et_pb_scroll_top.et-visible {
    -webkit-transform: translateX(100%);
    -ms-transform: translateX(100%);
    transform: translateX(100%);
    -webkit-transition: 0.5s;
    -o-transition: 0.5s;
    transition: 0.5s;
    -webkit-animation: none !important;
    animation: none !important;
}
Hiding distracting elements when the effect is triggered helps the visitor focus on your CTA section.
You can hide (animate, etc.) any other element on the page using the same approach.
Customize The CTA Layout
You can customize the CTA layout in Divi Builder like any other Divi layout.
But you should not apply any settings that could potentially conflict with our custom effect. Like Animation, Position, Transform and Scroll Effects settings.
Add Multiple Divi CTA Sections Expanding On Scroll
You can add more than one expanding CTA section to a page easily.
To do that simply assign different CSS classes for the CTAs content and background overlay sections as explained above.
And then call the dvcs_expanding_CTA() function for each by passing the CTA content section selector to it.
In fact, we are already applying the expanding effect for three different CTAs in our CSS and JS code provided above.
These are the three Divi CTA sections expanding on scroll layouts that come with our Freebies Package.
And the CSS class pairs used for these CTAs are as follows (content + overlay section classes):
- dvcs_expanding_cta & dvcs_expanding_cta_overlay
- dvcs_expanding_cta_2 & dvcs_expanding_cta_2_overlay
- dvcs_expanding_cta_3 & dvcs_expanding_cta_3_overlay
This way you can add as many expanding CTAs to a page as you like.
And you can design them differently, check out the live demos as an example.
Why Use The Intersection Observer API?
Performance is the main reason.
We’ve implemented the expanding CTA effect using the Intersection Observer API. But we could’ve done the same using the scroll event as well.
We could listen to scroll event to detect the position of our CTA section at any given time during scrolling and run our expanding CTA effect code as soon as our CTA section reaches the trigger point(s).
But doing it by listening to the scroll event can be too costly from the performance perspective. That’s because scroll event can fire at a really high rate running our code so many times that it can make the page sluggish.
To improve performance of the scroll event implementation we could try throttling and caching. However, some tests show that the Intersection Observer is still winning hands down, you can check out one of such tests here.
Now, I didn’t do any performance tests for this particular use case (the expanding CTA section) and actually there may or may not be any significant performance difference between the two methods.
But still, using a native browser API is better simply because you don’t need to add any third party JS libraries (jQuery?) and custom implementation (plugins?) to do this task.
I will not go into more technical details about the Intersection Observer API because that’s not the purpose of this tutorial. If you need more info please check out the MDN Web Docs.
Final Thoughts
CTA sections help make your offering more visible for your website visitors encouraging them to take action.
Making your CTA section expand(scale up) while the visitor scrolls the page helps draw his/her attention to your offering, potentially increasing conversion rates.
So, go ahead and create such a CTA section on your website as explained in this tutorial. Or subscribe to download the expanding CTA section layouts included in our Freebies Package.
And I hope you’ve learned something new from this tutorial. In this tutorial we’ve seen how to use the Intersection Observer API for creating Divi CTA sections expanding on scroll.
But that’s not the only thing you can create with it.
In fact, we’ve only scratched it’s surface. You can do a lot more with the Intersection Observer API, like lazy loading, infinite scrolling, etc.
Let me know your thoughts and suggestions in the comments section below.


